Electron – Cross Platform Desktop Apps Made Easy (Part 5) #ibmchampion

Today, I want to show, how we can use Electron’s Notification Api for Windows, Linux and macOS. All three operating systems provide means for applications to send notifications to the user.

Electron conveniently allows developers to send notifications with the HTML5 Notification API, using the currently running operating system’s native notification APIs to display it.

Lets write some code. From the past 4 parts of this tutorial you already know, that we start with a new, empty project. So, create a new folder in your projects folder, run npm init and npm install electron --save-dev to create package.json and add Electron as a dependency. Also add 2 new files; app.js and main.html.

Here is, how your project should look like.

{
  "name": "part5",
  "version": "1.0.0",
  "description": "",
  "main": "app.js",
  "scripts": {
    "start": "electron ."
  },
  "author": "Ulrich Krause",
  "license": "MIT",
  "devDependencies": {
    "electron": "^1.8.2"
  }
}
const {
    app,
    BrowserWindow
} = require('electron')

// Keep a global reference of the window object, if you 
// don't, the window will be closed automatically when 
// the JavaScript object is garbage collected.
let win

function createWindow() {
    win = new BrowserWindow({
        width: 800,
        height: 600
    })
    win.loadURL('file://' + __dirname + '/main.html')
}

app.on('ready', createWindow)
<!DOCTYPE html>
<html>

<head>
    <meta charset="UTF-8">
    <title>Desktop Notification</title>
</head>

<body>
    <h1>Desktop Notification</h1>
</body>

</html>

Avoid platform-dependent code

Before we start with our notification, here are some things, you need to know, when creating Electron applications for different platforms. There are some platform specific elements that you already might know from other programming languages.
Temp dir, path delimiter, just to name a few.

According to Electron’s ‘Coding Style

Avoid platform-dependent code:

  1. Use path.join() to concatenate filenames.
  2. Use os.tmpdir() rather than /tmp when you need to reference the temporary directory.

This being said, we will now make some modifications to app.js. We add some core Node.js modules ( lines 2, 3 ) to handle path and URL. Then we use methods from those modules to build the URL for main.html in line 23

// add core Node.js modules
const url = require('url')
const path = require('path')

const {
    app,
    BrowserWindow
} = require('electron')

// Keep a global reference of the window object, if you 
// don't, the window will be closed automatically when 
// the JavaScript object is garbage collected.
let win

function createWindow() {
    win = new BrowserWindow({
        width: 640,
        height: 480
    })
    
    // use url and path to make loading of main.html
    // platform independend
    win.loadURL(url.format({
        pathname: path.join(__dirname, 'main.html'),
        protocol: 'file:',
        slashes: true
    }))
}

app.on('ready', createWindow)

Next, we will add code to handle window and application closing, because macOS behaves a little bit different than Windows or Linux. Read the code comments for explaination.

// add core Node.js modules
const url = require('url')
const path = require('path')

const {
    app,
    BrowserWindow
} = require('electron')

// Keep a global reference of the window object, if you 
// don't, the window will be closed automatically when 
// the JavaScript object is garbage collected.
let win

function createWindow() {
    win = new BrowserWindow({
        width: 640,
        height: 480
    })

    // use url and path to make loading of main.html
    // platform independend
    win.loadURL(url.format({
        pathname: path.join(__dirname, 'main.html'),
        protocol: 'file:',
        slashes: true
    }))

    // Emitted when the window is closed.
    // Dereference the window object, usually you would store windows
    // in an array if your app supports multi windows, this is the time
    // when you should delete the corresponding element.
    win.on('closed', function () {
        win = null
    })
}

app.on('ready', createWindow)

// Quit when all windows are closed.
// On OS X it is common for applications and their menu bar
// to stay active until the user quits explicitly with Cmd + Q
app.on('window-all-closed', function () {
    if (process.platform !== 'darwin') {
        app.quit()
    }
})

// On OS X it's common to re-create a window in the app when the
// dock icon is clicked and there are no other windows open.
app.on('activate', function () {
    if (mainWindow === null) {
        createWindow()
    }
})

With these modifications, you now have a boilerplate that you can use when creating new Electron applications. You can also use electron-quick-start from GitHub which is similar.

Notifications

HINT: if you are working on Windows, the following sample will not work with all versions. It should work on Win 7 & 8, but might fail on Windows 10. Especially, if you have ‘Windows 10 fall creators update’ installed. This is a known issue. Notifications on Windows only work, if the application is packaged and installed on the target platform. Packaging and Installation is planned to be a topic for an upcoming article. If you are on Linux or macOS, you can keep on reading.

<!DOCTYPE html>
<html>

<head>
    <meta charset="UTF-8">
    <title>Desktop Notification</title>
</head>

<body>
    <h1>Desktop Notification</h1>
    <button type="button" name="button" onclick="doNotify()">Notify me</button>
    <script src="main.js"></script>
</body>

</html>

We add a button to our main.html ( line 11 ) that will call doNotify() when clicked and also add a script tag ( line 12 ). We then create a new main.js file in our project folder. main.js will contain the doNotify() function.

function doNotify() {
    const notification = {
        title: 'Basic Notification',
        body: 'This is an Electron notification'
    }
    const myNotification = new window.Notification(notification.title, notification)
}

I have created this example on a Windows 10 machine. As it is not showing the notification there, I moved my project folder to my Mac, and I get
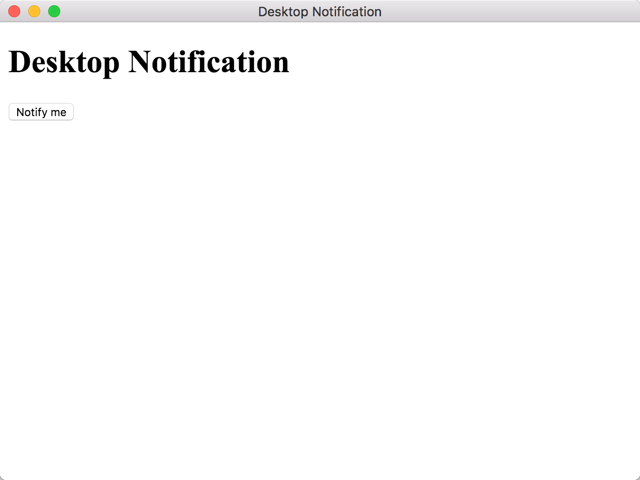
And when I click the ‘Notify me‘ button, the notification appears.

This is just a simple example. For more information see https://electronjs.org/docs/api/notification.

You can download the source code for this part of the tutorial here.

Electron – Cross Platform Desktop Apps Made Easy (Part 4) #ibmchampion

Today, I want to show how you can use a system file dialog in your Electron application to select a file in the filesystem and display its content.

As always, we will create a new application. Create a new folder in your projects directory, change into the folder and from a terminal window initialize the application with npm init. Then execute npm install electron --save-dev to install electron and add it as a dependency to package.json.

Don’t forget to add a start script to package.json. This will let you start your application from the command line by simply running the npm start command.

Your package.json should look similar like this.

{
  "name": "part4",
  "version": "1.0.0",
  "description": "",
  "main": "app.js",
  "scripts": {
    "start": "electron ."
  },
  "author": "Ulrich Krause",
  "license": "MIT",
  "devDependencies": {
    "electron": "^1.8.2"
  }
}

Next create a new file, app.js. That is the main file of our application.

On application start, we want to open a system file dialog when the main.html has been loaded. We can then browse and select a file in the filesystem. When the OK button is clicked, the application will load the file and display its content.

const {app, BrowserWindow, ipcMain} = require('electron') 
const url = require('url') 
const path = require('path') 

let win  

function createWindow() { 
   win = new BrowserWindow({width: 800, height: 600}) 
   win.loadURL('file://' + __dirname + '/main.html') 
}  

ipcMain.on('openFile', (event, path) => { 
   const {dialog} = require('electron') 
   const fs = require('fs') 
   dialog.showOpenDialog(function (fileNames) { 

      if(fileNames === undefined) { 
         console.log("No file selected");    
      } else { 
         readFile(fileNames[0]); 
      } 
   });
   
   function readFile(filepath) { 
      fs.readFile(filepath, 'utf-8', (err, data) => { 
         
         if(err){ 
            alert("An error ocurred reading the file :" + err.message) 
            return 
         } 
         
         // handle the file content 
         event.sender.send('fileData', data) 
      }) 
   } 
})  
app.on('ready', createWindow)

Have you noticed the let win in line 9? We have not used it before. But it is an important detail in an Electron app. Without this line your win object ( the main window of your application ) would be destroyed as soon as the garbage collection recyles the object, and your application will die. If you use let win, you are save.

When the main process loads main.html, the ipcRenderer on main.htmll sends the ‘openFile‘ message to the main process ( line 11 in main.html ).
In line 12 of app.js, this message is catched and the file dialog opens. You can then browse and select a file. Once you have confirmed your selection, the content of the file is being read into data and then send to the renderer in line 33 along with the ‘fileData‘ message.

<!DOCTYPE html> 
<html> 
   <head> 
      <meta charset = "UTF-8"> 
      <title>File read using system dialogs</title> 
   </head> 
   
   <body> 
      <script type = "text/javascript"> 
         const {ipcRenderer} = require('electron') 
         ipcRenderer.send('openFile', () => { 
         }) 
         
         ipcRenderer.on('fileData', (event, data) => { 
            document.write(data) 
         }) 
      </script> 
   </body> 
</html>

When the renderer receives the ‘fileData‘ message in line 14, it will write the content of data to the document.

This is only a simple example, but I think, that you got the idea of how to use system dialogs in your Electron application. Try to create a button, that opens the dialog on click. It is not that difficult 🙂

you can download the source code for this part of the tutorial here.

Electron – Cross Platform Desktop Apps Made Easy (Q & A) #ibmchampion

I got some very good feedback on the first 3 articles. So, thank you very much for kind words, critics and suggestions! Much appreciated.

Also, I got a couple of questions. Instead of answering the questions offline, I thought it is a good idea to add a Q&A article to the tutorial. I will add more content as questions are coming in.

I am NOT an expert in Javascript, Node.js or Electron. I will answer the questions as best I can. Feel free to add comments.

Q: I have never worked with Node.js and npm. What the heck is it?

Node.js is an open source, cross-platform runtime environment for developing server-side and networking applications. Node.js applications are written in JavaScript, and can be run within the Node.js runtime on OS X, Microsoft Windows, and Linux.

Node.js also provides a rich library of various JavaScript modules which simplifies the development of web applications using Node.js to a great extent.

Node.js = Runtime Environment + JavaScript Library

NPM is a package manager for Node.js packages, or modules if you like. It can be compared to Linux, where you use apt-get, yum and the like to add or update functions to the core Linux system. In Java, you would add .jar files from the Maven repository to your project to make specific classes and method available without reinventing the wheel. www.npmjs.com hosts thousands of free packages to download and use.

A package in Node.js contains all the files you need for a module. Modules are JavaScript libraries you can include in your project.

The NPM program is installed on your computer when you install Node.js. NPM creates a folder named “node_modules“, where the package will be placed. All packages you install in the future will be placed in this folder.

NPM = online repositories for node.js packages/modules which are searchable on search.nodejs.org

NPM = command line utility to install Node.js packages, do version management and dependency management of Node.js packages.

Q: I am using Visual Studio Code. Do I really need an additional terminal window to launch applications?

No, you don’t need an additional terminal window. Visual Studio Code comes with an integrated terminal.
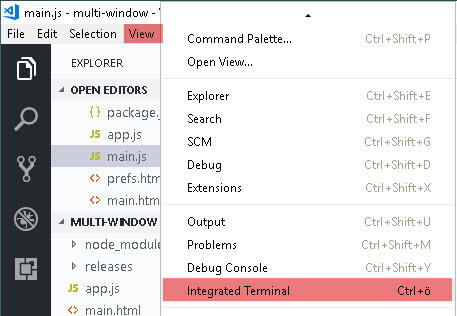
To activate click on “View -> Integrated Terminal”  or use Strg + Backtick ( Strg + ö when you have a German keyboard layout ) to toggle the integrated terminal on/off.

You can also open an additional instance of the terminal by clicking on the plus sign.

For more details on how to configure the integrated terminal, I recommend reading this article.

Q: Why no semicolons?

I thought it was still best to include them to avoid potential problems.

That’s a common misconception, here is a response to it: http://blog.izs.me/post/2353458699/an-open-letter-to-javascript-leaders-regarding

Is there a coding standard for Node.js which explains how semicolons should be used?

Oh yeah, there are a lot of coding standards. And that’s the problem. 🙂
I think I’ll just explain why I moved away from using semicolons. It’s easier to see potential errors this way.

I mean, if you use semicolons, one semicolon missing could go unnoticed. Because your eye is trained to treat them as end of line noise. Here is an example of an error that you could have:

function test() {
  var foo = '123';
  var bar = '456';
  var example = a_long_line_without_ending_semicolon
                                              //   ^^^ 
                                              // this would usually go unnoticed

  (function () {
    console.log(example); 
  })(example);
}

But if you don’t use them, the semicolon at the end of the line never matters.

Semicolons in JavaScript are optional

Here is an article that covers the topic in deep.

Q: Why you sometimes use curly braces with const and sometimes not?

To instantiate an Electron object, you would normally write

const app = require('electron').app
const BrowserWindow = require('electron').BrowserWindow
const ipcMain = require('electron').ipcMain

That is a lot of redundancy in code. A better way is to assign the entire Electron framework to an object und use this object to extract the Electron object that we want.

const electron = require('electron')
const app = electron.app
const BrowserWindow = electron.BrowserWindow
const ipcMain = electron.ipcMain

Slightly better, isn’t it?

Chrome 49 added destructuring assignment to make assigning variables and function parameters much easier and we can just write

const electron = require ('electron');
const {app, BrowserWindow, ipcMain} = electron;

or

const {app, BrowserWindow, ipcMain} = require ('electron');

as the shortest possible. You can use the latter, if you have a final list of objects. The first one is handy, if you want to get access to other Electron objects in your code. You simply reference to electron then.

Q: The menu is also visible in the Preferences page; how can I hide it?

In main.js, menu is build and added to the application in lines 18 and 19.

const {remote, ipcRenderer} = require('electron')
const {Menu} = remote.require('electron')

const template = [
    {
       label: 'Electron',
       submenu: [
        {
            label: 'Preferences',
            click: function() {
                ipcRenderer.send('show-prefs')
            }
        }
       ]
    }
]

var menu = Menu.buildFromTemplate(template)
Menu.setApplicationMenu(menu)

The static method Menu.setApplicationMenu(menu) sets menu as the application menu on macOS. On Windows and Linux, the menu will be set as each window’s top menu.

This explains, why the menu is also visible in the Preferences page. How can it be removed?

You can use autoHideMenuBar:true. This will auto hide the menu bar. The downside is that you can still toggle the visibility when the Alt key is pressed.

const electron = require ('electron');
const {app, BrowserWindow, ipcMain} = electron;
app.on('ready', function() {
  var mainWindow = new BrowserWindow({
      width:800,
      height:600
  });
mainWindow.loadURL('file://' + __dirname + '/main.html');
mainWindow.openDevTools();

var prefsWindow = new BrowserWindow({
  width:400,
  height:400,
  show:false,
  autoHideMenuBar:true
});

prefsWindow.loadURL('file://' + __dirname + '/prefs.html');

ipcMain.on('show-prefs', function() {
  prefsWindow.show()
});

ipcMain.on('hide-prefs', function() {
  prefsWindow.hide()
});
})


Electron – Cross Platform Desktop Apps Made Easy (Part 3) #ibmchampion

Today, we are going to create a multi window application using Electron. I assume that you already have Node.js installed.

Let us start and create a new folder in our projects directory. ( C:\projects\electron\multi-window ). Then open the folder in the command window.

Next use npm init to create the package.json file and install Electron and save it to our dev dependency with npm install electron --save-dev

Change the package.json so we can start our application using npm start later on.

Your package.json should now look like this.

{
  "name": "multi-window",
  "version": "1.0.0",
  "description": "",
  "main": "app.js",
  "dependencies": {
  "electron": "^1.8.2"
},
  "devDependencies": {},
  "scripts": {
  "start": "electron ."
},
  "author": "",
  "license": "ISC"
}

We can now start creating our first window. Create a new file app.js in the multi-window folder and open it in your preferred text editor.

The sample code below shows the minimal code that is needed to create the main window, give it a defined height and width and load the main.html file from the current directory using the file protocol.

const electron = require ('electron');
const {app, BrowserWindow} = electron;

app.on('ready', function() {
var mainWindow = new BrowserWindow({
   width:800,
   height:600
  })
  mainWindow.loadURL('file://' + __dirname + '/main.html')
})

And here is our simple main.html file

<html>
    <head>
        <title>Multi Window Application
        </title>
    </head>
    <body>       
       <h1>Main</h1>
    </body>
</html>

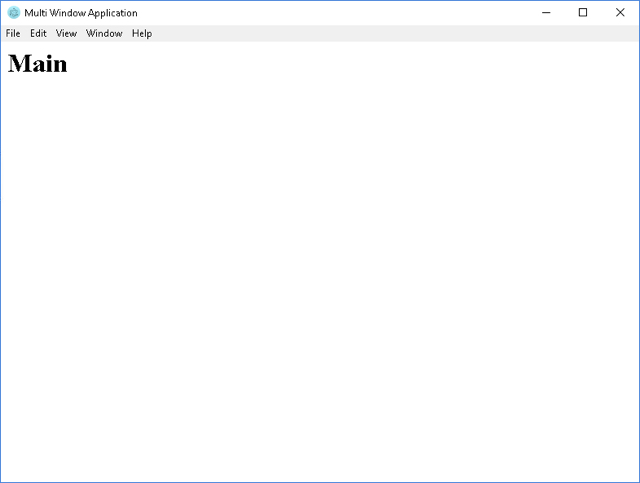
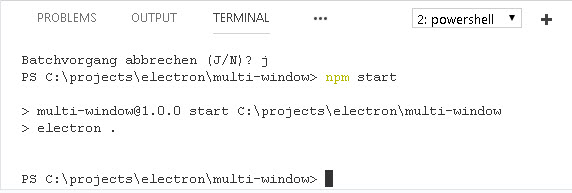
At this point, we can start our application with npm start. You should get

A useful thing to do when you’re working on an app is to open up the dev tool. We can do this by adding the following line to our app.js code.

mainWindow.openDevTools()

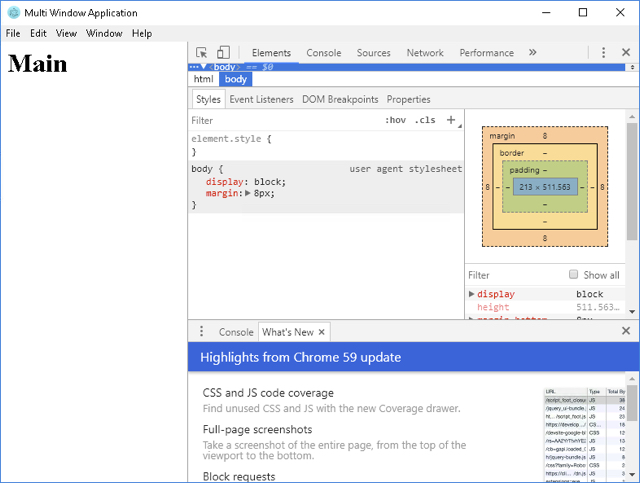
When you now start your application, the dev tools also open at startup.

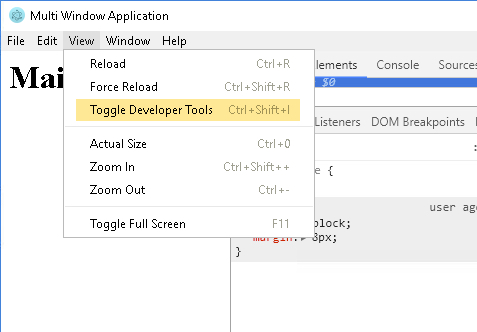
You can switch the tools off / on from the menu bar  “View -> Toggle Developer Tools” or using a keyboard shortcut command. If you deploy your application in production, comment out the line of code.

Create a custom menu bar

Lets create our own menu bar now. To do that, we add a new script tag to our main.html file.

<html>
    <head>
        <title>Multi Window Application
        </title>
    </head>
    <body>
        <h1>Main</h1>
        <script>require('./main.js')</script>
    </body>
</html>

Now that we are requiring the main.js in our main.html file, lets go ahead and create the main.js file. The file is going to handle all the javasript for our main window.

The first thing we want to do is to create a menu object. We can do that by typing

const {Menu} = require('electron')

which would perfectly fine, if we were in the app.js. app.js is the main process, and since we have loaded the main.js in the browser, we are in the renderer process.

So we can’t just simply require(‘menu’) here, we have to require the menu from the main process. To do that, we create a remote

const {remote} = require('electron')

and using this remote, we are able to call the require function, which will require the menu from the main process

const {Menu} = remote.require('electron')

Just be aware of this whenever you see remote. there are a couple of ways to create a menue. We will use a helper function that is on the Menu class

var menu = Menu.buildFromTemplate()

and you can just pass in a structured javascript object with the menu structure that you want. The code will create a main menu entry and a submenu; we will use the onClick event handler later.

const template = [
  {
   label: 'Electron',
   submenu: [
    {
     label: 'Preferences',
     click: function() {}
    }
   ]
  }
]

Then pass template as an argument to the function and attach the menu to our application.

var menu = Menu.buildFromTemplate(template)
Menu.setApplicationMenu(menu)

Lets go ahead and make that click do something. We could require a remote browser window in the onClick event itself, but it is not that efficient. A better way to do it is to manage all your windows in the main process.

Let us create a new window in app.js (lines 12 to 17).
We add a new prefsWindow the same way, we have added our mainWindow. The important thing here is show.false. When the app is ready, the prefsWindow is not yet shown.

const electron = require ('electron');
const {app, BrowserWindow} = electron;

app.on('ready', function() {
var mainWindow = new BrowserWindow({
      width:800,
      height:600
  })
  mainWindow.loadURL('file://' + __dirname + '/main.html')
  mainWindow.openDevTools()

  var prefsWindow = new BrowserWindow({
      width:400,
      height:400,
      show:false
  })
  prefsWindow.loadURL('file://' + __dirname + '/prefs.html')
})

Now we have that prefsWindow that is created but still hidden. And so we need a way to call and show that window when the Preferences menu item is clicked.

InterProcess Communication

To do that we use a thing called IPC ( InterProcess Communication ) which is very similar to remote. It allows us to send call back and forth between the main process and the renderer process.

Our main.js will look like this now

const {remote, ipcRenderer} = require('electron')
const {Menu} = remote.require('electron')

const template = [
    {
       label: 'Electron',
       submenu: [
        {
            label: 'Preferences',
            click: function() {
                ipcRenderer.send('show-prefs')
            }
        }
       ]
    }
]

var menu = Menu.buildFromTemplate(template)
Menu.setApplicationMenu(menu)

We have added a new varaiable ipcRenderer and use the ipRenderer to send a message when the menu item is clicked.

This will send a message up to our app, which we can catch in app.js

const electron = require ('electron');
const {app, BrowserWindow, ipcMain} = electron;

app.on('ready', function() {
  var mainWindow = new BrowserWindow({
      width:800,
      height:600
  })
mainWindow.loadURL('file://' + __dirname + '/main.html')
mainWindow.openDevTools()

var prefsWindow = new BrowserWindow({
  width:400,
  height:400,
  show:false
})
prefsWindow.loadURL('file://' + __dirname + '/prefs.html')

ipcMain.on('show-prefs', function() {
  prefsWindow.show()
})
})

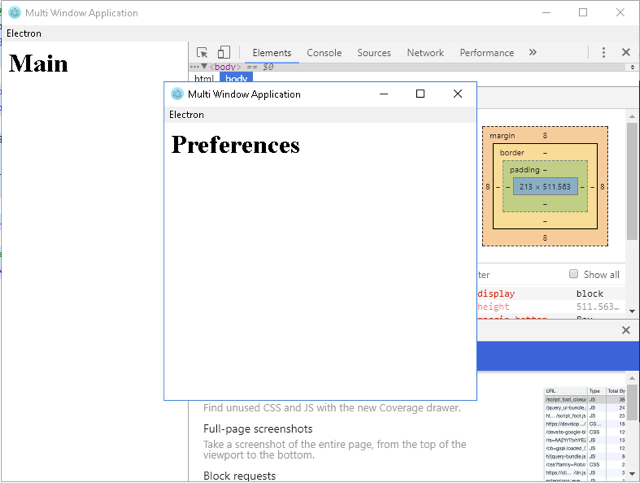
When you now start your application and click the “Preferences” menu item, a new window will open.

If you close the prefsWindow clicking the X, you will get an error when you try to open it again using the menu. The X will destroy the prefsWindow object and so it is no longer available.

Next we will send messages back from the prefsWindow to the mainWindow. In our prefs.html we create a new script tag ( lines 7 to 15 ) and by now, we add the script directly instead of loading another .js file.

<html>
  <head>
     <title>Multi Window Application</title>
  </head>
  <body>
  <h1>Preferences</h1>
     <script>
        const {ipcRenderer} = require('electron')
        var button = document.createElement('button')
        button.textContent = 'Hide'
        button.addEventListener('click', function() {
            ipcRenderer.send('hide-prefs') 
        })
        document.body.appendChild(button)
     </script>
  </body>
</html>

add the following (highlighted) snippet to app.js. The code will listen for the hide-prefs message from the prefsWindows and closes the windows.

ipcMain.on('show-prefs', function() {
  prefsWindow.show()
})

ipcMain.on('hide-prefs', function() {
  prefsWindow.hide()
})
})

Now you can close the prefsWindow with a click on the button and reopen it from the menu.

You can download the full code for this part of the tutorial from here.

Electron – Cross Platform Desktop Apps Made Easy (Part 2) #ibmchampion

In part one I explained what Electron is and why we want to use it to build cross-platform applications.

In this article, I will show you the tools needed for development. You will also learn about the architecture of an Electron application. We will then build our first application.

Getting started

If not already done, you need to install Node.js on your machine. As with any programming language, platform, or tool that doesn’t come bundled with Windows, getting up and running with Node.js takes some initial setup before you can start hacking away. In my experience, though Node.js has a far better installation experience on Windows than virtually any other language, platform, or tool that I’ve tried to use – just run the installer, and you’re good to go.

Here’s the abbreviated guide, highlighting the major steps:

  1. Open the official page for Node.js downloads and download Node.js for Windows by clicking the “Windows Installer” option
    Run the downloaded Node.js .msi Installer – including accepting the license, selecting the destination, and authenticating for the install.
    There is also an installer for Mac. You are running Linux? Take a look at the “How to install Node.js on Linux” tutorial.
  2. This requires Administrator privileges, and you may need to authenticate
  3. To ensure Node.js has been installed, run node -v in your terminal – you should get something like v8.9.4
  4. Update your version of npm with npm i -g npm
  5. This requires Administrator privileges, and you may need to authenticate
  6. Congratulations – you’ve now got Node.js installed, and are ready to start building!

To create/edit the source code for your application, use your favorite text editor. I’m going to use Visual Studio Code which is built on… you guessed it… Electron!

Optional, you might want to install Git or any other SCM of your choice.

Electron Application Architecture

To start with Electron development, create a folder on your local machine that holds the project files. I am using c:/projects/electron as the root for my Electron projects.

A simple Electron application has the following structure:

  • index.html
  • main.js
  • package.json
  • render.js

The file structure is similar to the one we use when creating web pages.

  • index.html which is an HTML5 web page serving one big purpose: our canvas
  • main.js creates windows and handles system events. It handles the app’s main processes
  • package.json is the startup script for our app. It will run in the main process and it contains information about our app
  • render.js handles the app’s render processes

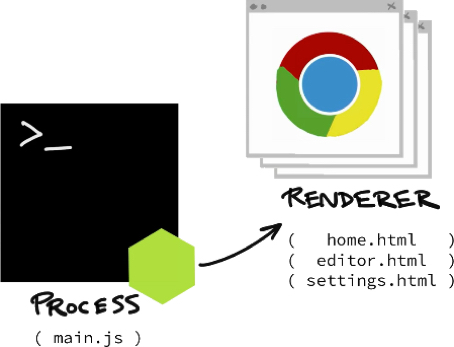
You may have a few questions about the main process and render process. What the heck are they and how can I get along with them?
Glad you asked. Hang on to your hat ’cause this may be new territory if you’re coming from browser JavaScript realm!

What is a process?

When you see “process”, think of an operating system level process. It’s an instance of a computer program that is running in the system.

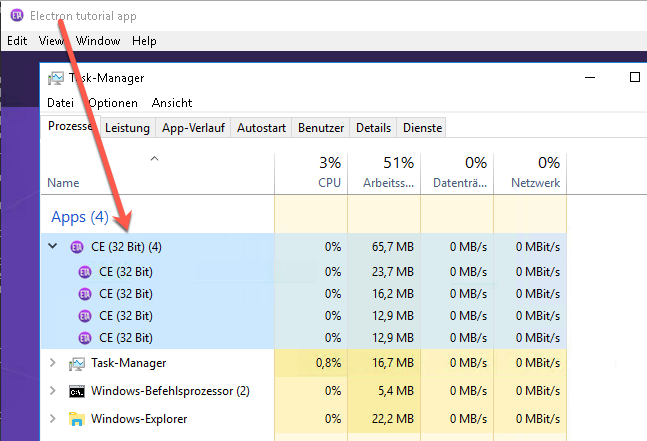
When you start your Electron app and check the Windows Task Manager or Activity Monitor for macOS, you can see the processes associated with your  app.

Each of these processes run in parallel. But the memory and resources allocated for each process are isolated from the others.

Main process

The main process controls the life of the application. It has the full Node.js API built in and it opens dialogs, and creates render processes. It also handles other operating system interactions and starts and quits the app.

By convention, this process is in a file named main.js. But it can have whatever name you’d like.

Render process

The render process is a browser window in your app. Unlike the main process, there can be one to many render processes and each is independent.

Because every render process is separate, a crash in one won’t affect another. This is thanks to Chromium’s multi-process architecture.

If all processes run concurrently and independently, one question remains. “How can they be linked?

For this, there’s an interprocess communication system or IPC. You can use IPC to pass messages between main and render processes. I will explain IPC in an upcoming article.

Too much theory? OK then …

Create a simple Electron application

Create a new folder first-app in your Electron project folder c:/projects/electron.

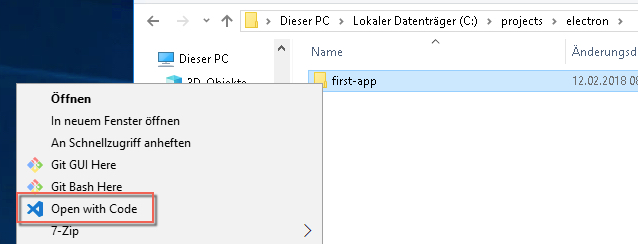
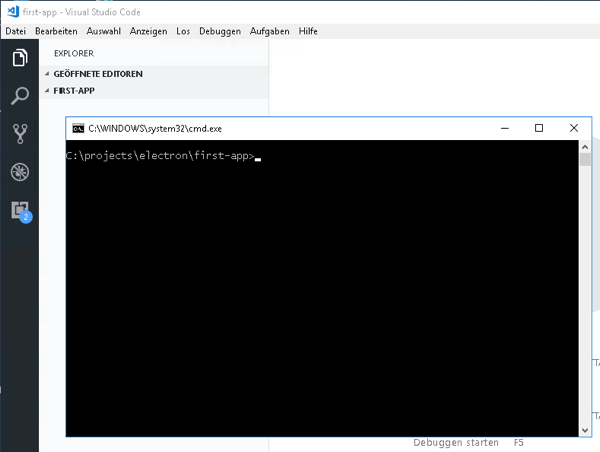
Open the first-app folder with Visual Studio Code. Also open a new cmd window / terminal.

Next run npm init from the commad window

C:\projects\electron\first-app>npm init
This utility will walk you through creating a package.json file.
It only covers the most common items, and tries to guess sensible defaults.
See `npm help json` for definitive documentation on these fields
and exactly what they do.
Use `npm install ` afterwards to install a package and
save it as a dependency in the package.json file.
Press ^C at any time to quit.
package name: (first-app)
version: (1.0.0)
description: Sample Electron Application
entry point: (index.js) main.js
test command:
git repository:
keywords:
author: Ulrich Krause
license: (ISC) MIT
About to write to C:\projects\electron\first-app\package.json:
{
"name": "first-app",
"version": "1.0.0",
"description": "Sample Electron Application",
"main": "main.js",
"scripts": {
"test": "echo \"Error: no test specified\" && exit 1"
},
"author": "Ulrich Krause",
"license": "MIT"
}
Is this ok? (yes)

Just follow the steps and fill in the information that is needed. I only changed the “main” value from index.js to main.js.
If everything looks good, confirm the last question. This will create a package.json file in the first-app folder. The file is also available in VS Code.

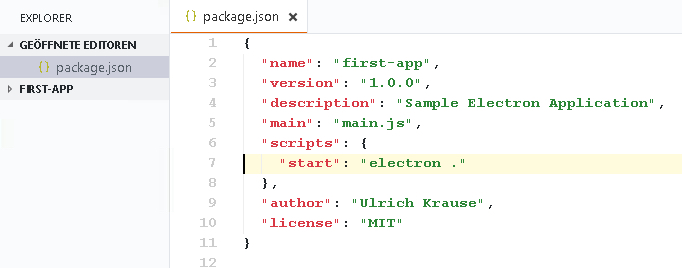
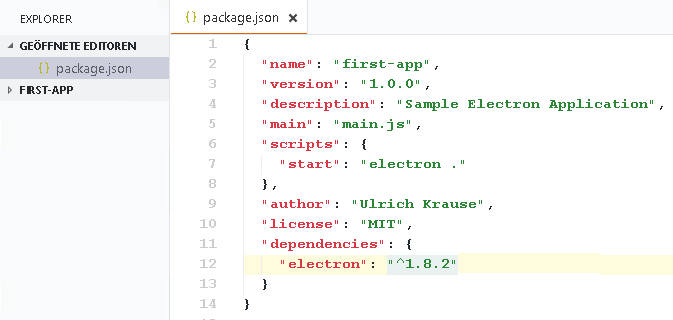
Open package.json, remove "test": "echo \"Error: no test specified\" && exit 1" and add "start": "electron ." in the script section.

Your file content should now look like this.

Run npm install --save electron. This will download and install Electron and add it as a dependency to our package.json file.

C:\projects\electron\first-app>npm install --save electron

> electron@1.8.2 postinstall C:\projects\electron\first-app\node_modules\electron
> node install.js

Downloading SHASUMS256.txt
[============================================>] 100.0% of 3.43 kB (3.43 kB/s)
npm notice created a lockfile as package-lock.json. You should commit this file.
npm WARN first-app@1.0.0 No repository field.

+ electron@1.8.2
added 152 packages in 44.765s

That’s it for now, so lets close the file and lets create our main.js file, which is our main process file.

Here we gonna bring in a couple of things, of course Electron.

const electron = require('electron');

We also wanna bring in a couple of core modules. Bring in the URL module, which is a core node.js module.

const url = require('url');

And then also the path module

const path = require('path');

Next we grab some stuff from Electron. We need the app object and we also need the BrowserWindow object.

const {app, BrowserWindow} = electron;

Next thing we wanna to is to create a variable representing our main window

let win;

Lets work on the main window now

In Electron, what we have to do first is listen for the app to be ready. We do that by saying

// run create window function
app.on('ready', createWindow);

And once the app is ready, we run a function createWindow and this is where we want to create our window

win = new BrowserWindow ({width:800,height:600});

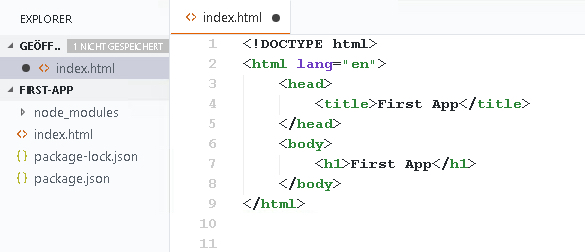
Next thing is to load the HTML file into our browser window. We don’t have the HTML file yet, so lets create it.

That’s all we want to do for the HTML right now. Back to main.js and we’re going to take the win object and call

win.loadURL(url.format({
pathname: path.join(__dirname, 'index.html'),
protocol: 'file',
slashes:true
}))

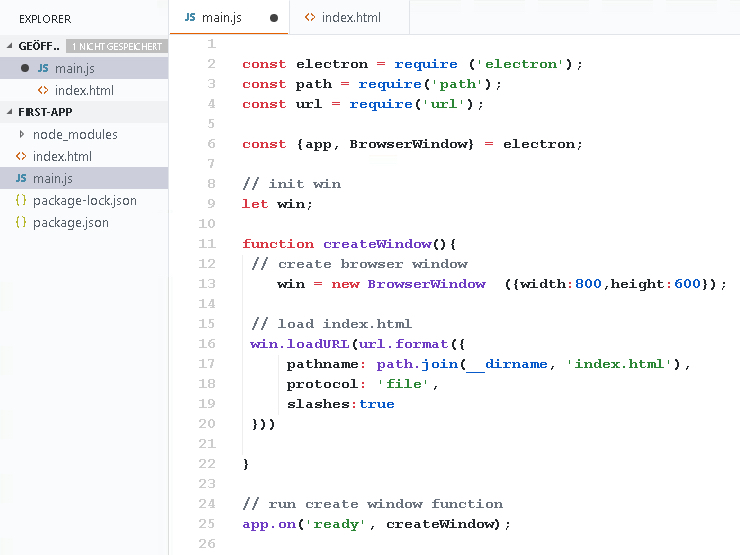
This will simply pass whatever the current directory is plus the index.html, using the file protocol into the loadURL method.

Your main.js file should now have the following content


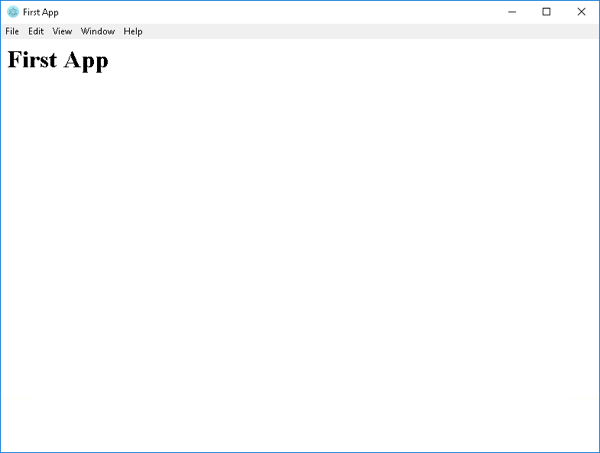
Actually, now we can try out our application for the first time.

run npm start from the command line and here we go.

Since we don’t havn’t create our own menu items or anything, we have the default menue, which has File and Edit options as well as View where we can toggle DevTools and stuff.

Congratulations! You have successfully created and run your first Electron application.

In the next part of this tutorial, we will dig deeper into Electron and add some functionallity to our application.


Electron – Cross Platform Desktop Apps Made Easy (Part 1) #ibmchampion

We are all victims of a revolution where building apps and websites becomes easier every single day.
Electron is definitely a part of this revolution. and in case you still don’t know what is Electron and which apps are using it….

In this part one of a series of blog posts, I want to explain the basics of Electron.

So, what exactly is this Electron thing anyway?

Electron is a framework for creating native applications with all the emerging technologies including JavaScript, HTML and CSS. Basically, Electron takes care of the hard parts so that you can focus on the core of the application and revolutionize its design.

Designed as an open-source framework, Electron combines the best web technologies and is a cross-platform – meaning that it is easily compatible with Mac, Windows and Linux.

It comes with automatic updates, native menus and notifications as well as crash reporting, debugging and profiling.

Electron (formerly known as Atom Shell) is an open-source framework created by Cheng Zhao, and now developed by GitHub.

  • On 11 April in 2013, Electron was started as Atom Shell.
  • On 6 May 2014, Atom and Atom Shell became open-source with MIT license.
  • On 17 April 2015, Atom Shell was renamed to Electron.
  • On 11 May 2016, Electron reached version 1.0.
  • On 20 May 2016, Electron allowed submitting packaged apps to the Mac App Store.
  • On 2 August 2016, Windows Store support for Electron apps was added.

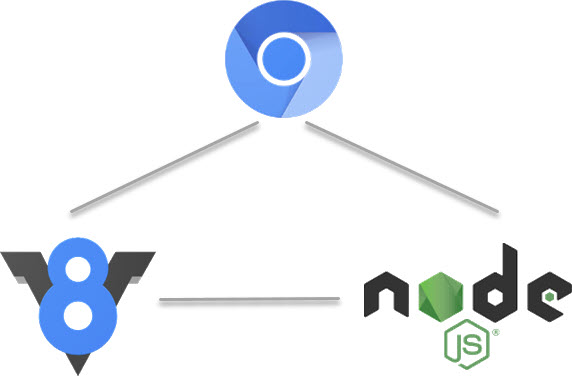
Electron is build on three core components.

Chromium. An open-source browser project that aims to build a safer, faster, and more stable way for all users to experience the web. This site contains design documents, architecture overviews, testing information, and more to help you learn to build and work with the Chromium source code.

V8. Google’s open source high-performance JavaScript engine, written in C++ and used in Google Chrome, the open source browser from Google, and in Node.js, among others. It implements ECMAScript as specified in ECMA-262, and runs on Windows 7 or later, macOS 10.5+, and Linux systems that use IA-32, ARM, or MIPS processors. V8 can run standalone, or can be embedded into any C++ application.

Node.js. A JavaScript runtime built on Chrome’s V8 JavaScript engine. Node.js uses an event-driven, non-blocking I/O model that makes it lightweight and efficient. Node.js’ package ecosystem, npm, is the largest ecosystem of open source libraries in the world.

What are some successful applications built with Electron?

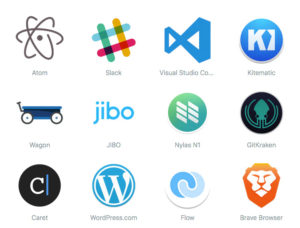
Electron is the main GUI framework behind several notable open-source projects including GitHub’s Atom and Microsoft’s Visual Studio Code source code editors, just to name a few. You can find a verbose list of applications built with Electron here.
Also, IBMs Watson Workspace is available as Electron application since mid 2017.  ( Source: DNUG )

Why would I want to build a desktop application in the first place?

Web application development has come so far. It seems weird, right ?

But it turns out, that actually there are a few reasons, why you want to build desktop applications even in 2018.

Here is a couple of the reasons:

The first one is perhaps your application requirements has a need to run in the background. You don‘t want to rely on your browser being up because your browser might crash,  and if your browser crashes, that background application dies.

The other thing is you might require file system access. The things that make browsers so powerful with web applications and so usable is because of the security model in browsers.
You‘re downloading arbitrary code from the internet and you are executing it on your machine. Browsers have to be extremely sandboxed in order to people will trust them. And as a result of that, things like file system access are things that you are completely locked out.

Perhaps your application requirements also require direct API access to something.
If you download a web application, you cannot tell this application to initiate a connection from my browser to some API over there. You can‘t do that.
So, if you need to do this kind of connection, you have to do it from your local machine. This is why we have i.e a POSTMAN application.

Maybe, your application requires access to your hardware. For example, you have a bluetooth card or want to play with Sphero, or you have a smart-card reader. That kind of stuff, you can‘t do from a browser.
You need access to local API that speak to your local hardware in order that you can make those connections.

But why else would you want to write an application that works on the desktop today?

Perhaps you have a requirement for on premises access. It might not make sense to install a web application with a webserver and stuff if a firewall would stop access.

The other reason is you might require binary protocol access. If you need to make a connection to a MySQL database, you need to make those connections using mysql drivers that compile down to C that you can use as a client library.

And the other thing is that some applications just feel right on the desktop. That is why we (all) have installed Slack app on our machines instead of using the web application.

Another this is GAMES. The desktop is still the predominant place to download and run games.

That is why I think that there is still a place for desktop applications; even in the year 2018.

Why would I want to build a desktop application in Electron?

There are some reasons for that , too

One of the things, electron gives you, is that you only have to learn one framework, and what I mean by that is, you just have to learn electrons API.
It is relatively small. And you can reuse all your JS, HTML and CSS that you‘ve been using for all theses years.

If you are on a MAC, you do not have to learn Cocoa, you do not have to learn the Windows APIs and whatever Linux is using these days for the desktop. You do not have to worry about any of that.

You just use Electron, write your code once and run it on Windows, MAC and Linux.

The other thing is , Electron gives you some amazing tight integration. You can do stuff like activating notifications. You have access to the task switcher. You have access to menues, You have access to global shortcuts. You have access to system level events, so you can detect when your computer is going to sleep, when your computer wakes up or your CPU is going nuts and do something about it.

And finally you get a lot of code reuse with electron.

If your application is a companion to a web application, there is a really good chance that you can take some of the assets that you are using in the frontend and with a little bit of work, transport them over to your electron application.

As a bonus, if your backend is running node.js there is also a really good chance that you can take some of the backend code that is running node.js and transplant it into your Electron application.

You can save a lot of time if you already have that companion web application.

There is actually more.

If you write an application in Electron, there is actually a lot of problems that traditional web developers have already solved over the years and you do not have the need to think about it anymore.

You get Chrome dev tools, for free, when you are start developing an Electron application.

The reason for that is that one of Electrons core components is the Chromium engine.
Your application windows are actually Chromium windows.
And this gives you Chrome dev tools within your application and you can debug your code right inside your application.

And Chrome dev tools is pretty much state-of-the-arte when it comes to debug web applications.

And this one, I think, is also important.

The desktop is a new frontier for developers. Especially web developers. Web developers have traditionally been locked out from the entire part of the desktop application development culture.

We now have the tools to take our skills that we have learned all these years and bring them to a completely new place where we have never been before.

In the next part, you will learn more about the structure of an Electron application. I will show you the parts needed to setup a development environment and how to build your first Electron application.


Ytria DatabaseEZ – Get application summary data #ibmchampion

A couple of days ago, I wrote about using domino-jna in a DOTS task to get information from the application summary buffer. Andre Hausberger from Ytria sent me a mail asking, why I am using Notes Peek to create a screenshot for the information I want to retrieve from the application.

My answer was, “I cannot find it in DatabaseEZ or ScanEZ. I can see some of the information, but I want to get access to all properties at once.  This is a good starting point to find out, where IBM stores values for new properties

After a short while, Andre sent me another message. “Set YtriaDbEZDebugInfo=3 in your client notes.ini, and your ready to go.

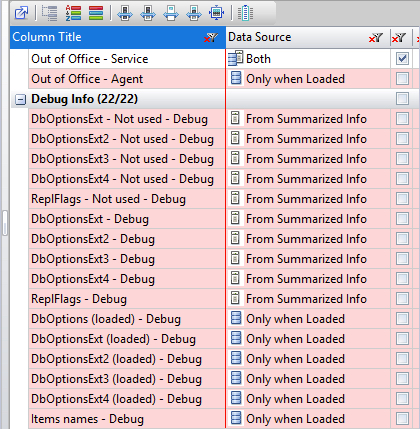
Set the variable and restart DatabaseEZ. Then select a server to analyse. When you now open the  Grid Manager ( crtl + j ), you can add additional colums to the grid.

The downside is that not all information is available right after adding the columns; you have to do a “Load complete database information”. And ( you can proof me wrong with this ), you can only analyse one server at a time. Not exactly what I wanted to do.

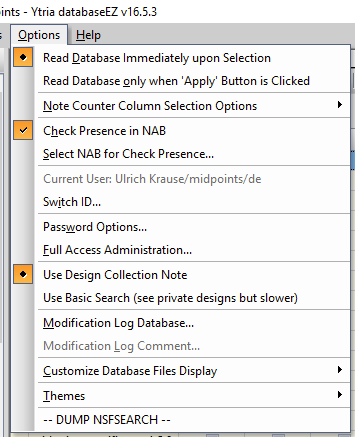
When you set the notes.ini variable, an additional action is added to the Options menu .

For each application on a selected server, the DUMP NSFSEARCH action will create a single document in a Notes application. The database must exist; there is no template for this. Just create a database from a blnk template.

You can store the dump of several servers in the same dump database. The server name is being set as the form name, so you can categorize / group the documents afterwards.

The dump also contains documents for each directory, redirection or other files. You can set a filter on the $type colums to filter only Notes applications ($NOTEFILE).

After you have collected the data, use ScanEZ to analyze the data.

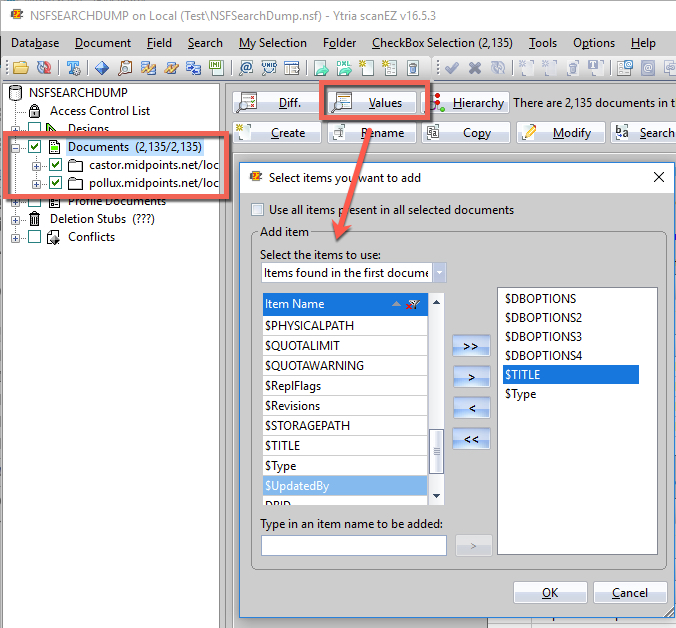
Open the dump database in ScanEZ, select one or all servers in the documents section and click the “Values” button. Then add all columns or only the relevant columns and clik OK


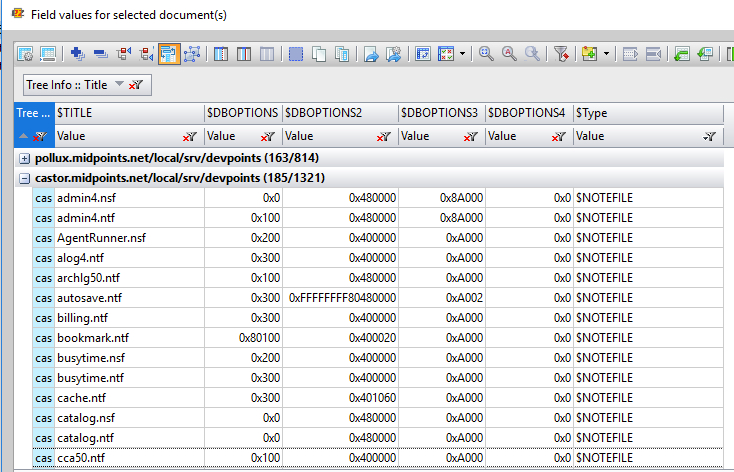
You will then get a grid with all information you selected

Set a value filter on the $type column and format the Options columns to show data as hexadecimal.

From there, filtering, sorting, searching, so in a word deep data analysis on some servers is an easy thing to do…


IBM / HCL support #ibmchampion

I would like to share my experience with the latest support request that I opened with IBM. The problem is only a small one, and you can work around it easily, but I thought that I should report it.

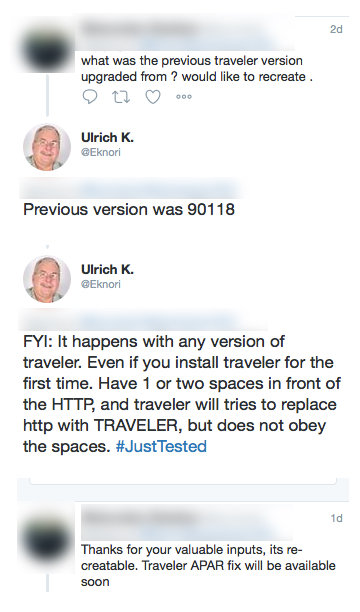
Not long after I tweeted about the issue, I was just testing on another machine to find out, if the problem is reproducible when I got a reply asking about the exact version of IBM Traveler that I upgraded from.

I replied. Did not know, who was asking. Thought, it was just another Traveler admin. Shortly after, I found out that the issue is not bound to any specific version of Traveler.

A day later, there was another reply to my tweet. I have copied the tweets from my timeline. See yourself.

Isn’t that great? Not only, the problem was reproducible by someone other than me. But also the fact that someone cares about a problem that had not yet officially been reported to IBM.

I found out later that the person replying to my tweets is working for IBM / HCL.

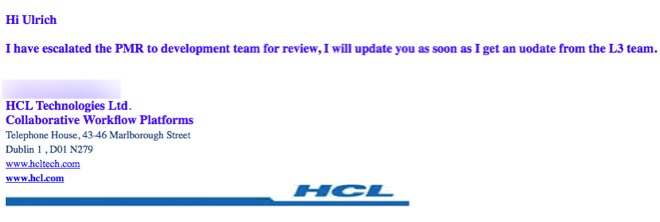
Yesterday, I created a support request. Today, I got a mail from support.

This is one of the best experiences that I ever had with support in all the years. Perhaps, HCL brings a new level of awareness to the whole support process. Maybe, they are looking for potential problems more proactive using modern communication channels.

For me as a customer, it is a good feeling to see that someone is listening ( and cares ).


[LE4D] – HTTP challenge validation fails #ibmchampion

We recently got feedback from customers where the HTTP challenge validation fails with no obvious reason. First of all, this issue is not limited to LE4D only.

Assume, you want Lets Encrypt to issue a certificate for foo.example.com.

You configure LE4D, run the agent and get the message

“HTTP JVM: org.shredzone.acme4j.exception.AcmeException: Failed to pass the challenge for domain foo.example.com, … Giving up.”

This indicates that the Lets Encrypt server cannot read the challenge token in the .well-known/acme-challenge directory.

There are a couple of reasons, why the token cannot be accessed

  • authentication required
  • server not listening on port 80 / 443
  • server is not the server for foo.example.com

In our case, no authentication is required, the server can be reached at port 80; we even could access the challenge token via a browser. So there is no obvious reason, why the validation should fail. But it does.

I contacted Lets Encrypt and the finally found an answer. The problem is with DNS and CAA.

CAA is a type of DNS record that allows site owners to specify which Certificate Authorities (CAs) are allowed to issue certificates containing their domain names. It was standardized in 2013 by RFC 6844 to allow a CA “reduce the risk of unintended certificate mis-issue.”. By default, every public CA is allowed to issue certificates for any domain name in the public DNS, provided they validate control of that domain name. That means that if there’s a bug in any one of the many public CAs’ validation processes, every domain name is potentially affected. CAA provides a way for domain holders to reduce that risk.

Lets Encrypt checks the CAA record prior to validating the challenge, If the check fails, also the validation fails.

How can you test, if you are running into a CAA error?

If you are on Linux, you can use dig to check your domain for CAA records ( use nslookup on Windows )

We checked the CAA record for example.com first

dig caa example.com

<<>> DiG 9.9.4-RedHat-9.9.4-51.el7_4.1 <<>> caa example.com
;; global options: +cmd
;; Got answer:
;; ->>HEADER<<- opcode: QUERY, status: NOERROR, id: 5006
;; flags: qr rd ra; QUERY: 1, ANSWER: 0, AUTHORITY: 1, ADDITIONAL: 1

;; OPT PSEUDOSECTION:
; EDNS: version: 0, flags:; udp: 512
;; QUESTION SECTION:
;example.com. IN CAA

;; AUTHORITY SECTION:
example.com. 180 IN SOA ns0.dnsmadeeasy.com. dns.dnsmadeeasy.com. 2008010137 43200 3600 1209600 180

;; Query time: 28 msec
;; SERVER: fd00::ca0e:14ff:fe6a:3932#53(fd00::ca0e:14ff:fe6a:3932)
;; WHEN: Sa Jan 20 18:39:04 EET 2018
;; MSG SIZE rcvd: 95

You can see that the query returns NOERROR. Even if the CAA record for example.com is empty, that is ok.
Lets Encrypt will receive the NOERROR status and next, it will try to get the challenge token.

Now, lets check foo.example.com

dig caa foo.example.com

<<>> DiG 9.9.4-RedHat-9.9.4-51.el7_4.1 <<>> caa foo.example.com
;; global options: +cmd
;; Got answer:
;; ->>HEADER<<- opcode: QUERY, status: SERVFAIL, id: 9535
;; flags: qr rd ra; QUERY: 1, ANSWER: 0, AUTHORITY: 0, ADDITIONAL: 1

;; OPT PSEUDOSECTION:
; EDNS: version: 0, flags:; udp: 512
;; QUESTION SECTION:
;foo.example.com. IN CAA

;; Query time: 2 msec
;; SERVER: fd00::ca0e:14ff:fe6a:3932#53(fd00::ca0e:14ff:fe6a:3932)
;; WHEN: Sa Jan 20 18:44:27 EET 2018
;; MSG SIZE rcvd: 45

Now we get a status of SERVFAIL.

Most often this indicates a failure of DNSSEC validation. If you get a SERVFAIL error, your first step should be to use a DNSSEC debugger like dnsviz.net.
If that doesn’t work, it’s possible that your nameservers generate incorrect signatures only when the response is empty.
And CAA responses are most commonly empty. For instance, PowerDNS had this bug in version 4.0.3 and below.

If you don’t have DNSSEC enabled and get a SERVFAIL, the second most likely reason is that your authoritative nameserver returned NOTIMP, which as described above is an RFC 1035 violation; it should instead return NOERROR with an empty response.
If this is the case, file a bug or a support ticket with your DNS provider.


Explore the hidden parts of an application #ibmchampion

Did you ever ask yourself, where Notes/Domino stores the information about specific application properties like DAOS and NIFNSF and how to get access to this information?

Most of the information about an application is accessible by methods and properties in the NotesDatabase class from LotusScript or Java. But there are also a lot of information that is not accessible. LotusScript / Java has never been enhanced to access this information, and I have a strong doubt that it will be enhanced in future releases.

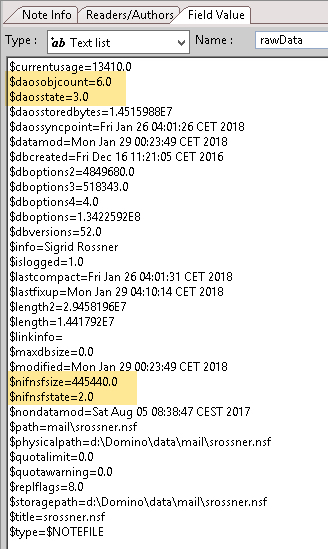
Let’s find out, where we can find i.e. the number of documents that have a reference to an NLO file in the DAOS repository. In addition, we want to know, if an application is enabled for NIFNSF and what the size of the index is.

This information is stored in the summary information of an application. This area cannot be accessed with LotusScript or Java; you will need C-API. You have no clue about C-API? Well, no worries. I will first show you, where you can find the data. Afterwards, I will show you, how you can access it.

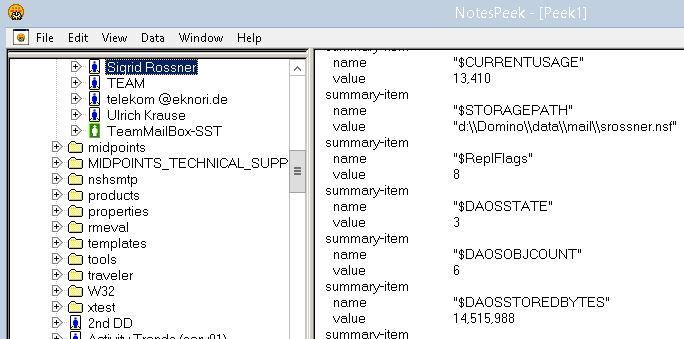
Notes Peek is a good way to start with.

In the screenshot, you see a part of the summary information of an application.

As I said before, this part of an application can only be accessed with C-API.

Karsten Lehmann has published a great Java library that let you use C-API calls from a Notes/Domino Java application. It can also be used with XPages. Aside from a great performance boost, you can benefit from callbacks.
Domino-JNA gives you access to numerous CAPI calls using Java. You do not have to know anything about CAPI.

As part of domino-jna, there is a class called “DirectoryScanner”. DirectoryScanner can be used to scan the content of the data directory of a Notes / Domino installation. It has a couple of parameters that let you configure which directory to start the scan with, which kind of applications ( *.NS?, *NT?, *.BOX ) to scan either in one directory or recursive.

DirectoryScanner returns the summary information for each application. The scan is lightning fast.

serv01 and serv02 host 560 applications. Look at the time it takes to get the scan done. Amazing, isn’t it?

Here is the piece of code that does the magic.

for (Server server : configProvider.getServersList()) {

logger.addLogEntry(strTask+" scanning data directory on server: "+ server.getServerName(),Log.LOG_INFO, true);

DirectoryScanner directoryScanner = new DirectoryScanner(server.getServerName(), "",
EnumSet.of(FileType.ANYNOTEFILE, FileType.RECURSE));

List summaryData = directoryScanner.scan();

// your code here ...
}

directoryScanner.scan() returns the summary information for every application.
You can then write this information to a Notes Database and use it to build your own catalog task for example.

The summary information also contains the values for NIFNSF if configured for an application. This would give you an overview, how many applications are NIFNSF enabled without accessing the server console.
Take a look at the “options” data. Great way to get all options for an application with a small ammount of code. Write some Java code to decipher the options. Not hard to do.

The cool thing about Notes/Domino is that you can write your own enhancements if you are missing a functionallity. domino-jna is a great example for this. Use CAPI calls from Java. No expert knowledge in C/C++ necessary.


[Timesaver] – Homebrew update / upgrade failed

I am running macOS High Sierra 10.13.2 on my MacBook Pro. After upgrading the OS earlier today, I also wanted to give the applications an upgrade that I had installed using HomeBrew.

I typed “brew update && brew upgrade” in the terminal and got the following error

Error: /usr/local is not writable. You should change the
ownership and permissions of /usr/local back to your
user account:
 sudo chown -R $(whoami) /usr/local

Doing a

sudo chown -R $(whoami) /usr/local

results in

chown: /usr/local: Operation not permitted

To make a long story short, I ended up with re-installing HomeBrew with

/usr/bin/ruby -e "$(curl -fsSL https://raw.githubusercontent.com/Homebrew/install/master/install)"

After the re-install, everything works.


[IBM Traveler 9.0.1.20] – Error encountered while saving database configuration.

I ran into an issue when trying to add a new IBM Traveler server to an existing HA pool.

The pool already contains 1 IBM Traveler server, so there already is an existing DB2 database instance. ALso, I made sure that the new server can access the DB2 database.

To add a server to the pool, you have to prepare the existing LotusTraveler.nsf. This is done be executing the following command from inside the /local/notesdata/traveler/util/ directory in the shell or in an command prompt if you are on a Windows machine.

./travelerUtil db set url=jdbc:db2://server.example.tld:50000/TRAVELER user=db2user pw=db2password

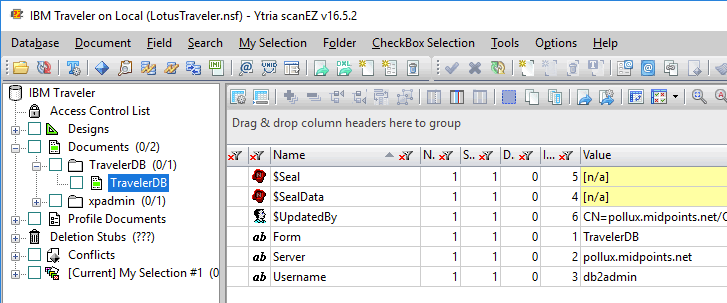
The command will add a new view “(TravelerDb)” to the LotusTraveler.nsf and then creates a new document to store the credentials to access the Db2 database.

But the command did not ran es expected; it threw an NotesException:

Using JDBC jar: /opt/ibm/domino/notes/90010/linux/Traveler/lib/db2jcc4.jar [25990:00006-00007F47D0C01700] 06.12.2017 09:26:59 03:3E [25990:00006-00007F47D0C01700] 06.12.2017 09:26:59 03:3E Checking database connection to: jdbc:db2://castor.midpoints.net:50000/TRAVELER Connection successful. Error encountered while saving database configuration. NotesException: 0xFCC at lotus.domino.local.View.NcreateColumn(Native Method) at lotus.domino.local.View.createColumn(Unknown Source) at com.lotus.sync.util.ConfigurationBackendDomino.setPasswordFields(ConfigurationBackendDomino.java:1048) at com.lotus.sync.util.ConfigurationBackendDomino.setPW(ConfigurationBackendDomino.java:1132) at com.lotus.sync.util.OfflineUtilities.handleDB(OfflineUtilities.java:1487) at com.lotus.sync.util.OfflineUtilities.execute(OfflineUtilities.java:357) at com.lotus.sync.util.OfflineUtilities.main(OfflineUtilities.java:2677)

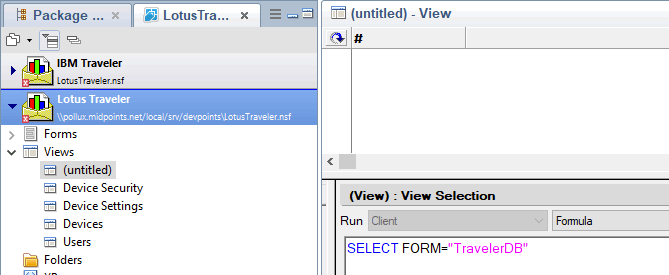
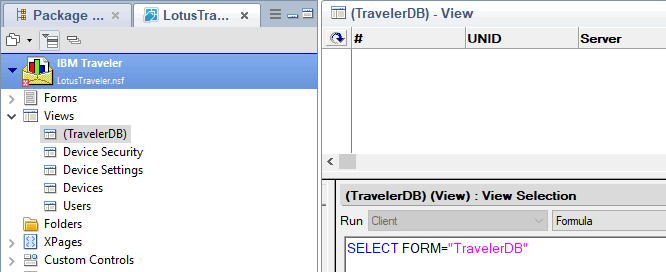
Apparently, it failed to create a column in the view. I opened the LotusTraveler in DDE and saw the following in the view section.

The view has been created, but not with the correct name and apparently 1 or more columns are missing. Good news. The document holding the credentials has been created.

I opened the LotusTraveler.nsf from my existing HA server. Here is what the view looks like in DDE

As a workaround, you can delete the (untitled) view and replace it with the (TravelerDb) view from your existing LotusTraveler.nsf

Then you can restart LotusTraveler and the server will be added to the existung pool.

I am not sure, if this is 9.0.1.20 specific. Also I could not find anything about this error on the web. I will open a PMR with IBM.


Extreme slow RDP performance on Windows 2012 R2 server running on VMware ESXi

I am running a  Windows 2012 R2 servers on a VMware ESXi environment ( 6.5.0 Update 1 (Build 5969303 ) . I experience an extreme poor performance on the Windows 2012R2 server when connection with any RDP-client ( Windows and Mac )

The hardware shouldn’t be an issue.

  • the server does not have a high overall load
  • there is no high CPU load
  • there is enough RAM
  • there is no high I/O

This is what I did to solve the issue and get back to fast RDP-performance.

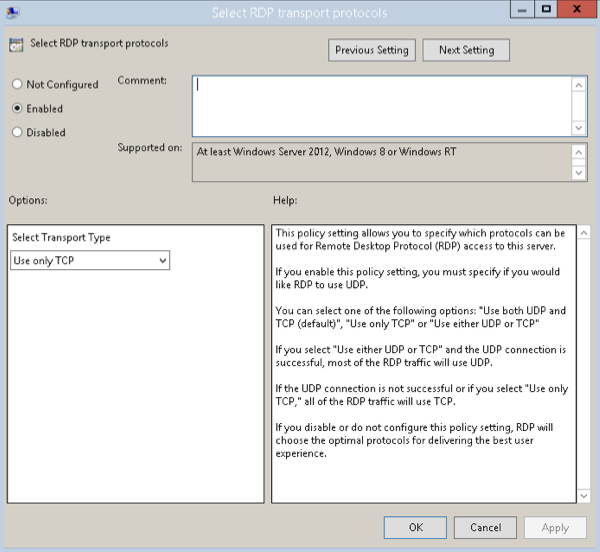
1. Finetune “Remote Desktop Services” in Group Policy

Open Group Policy Editor ( Start -> Run -> gpedit.msc )

Goto Computer Config > Windows Settings > Administrative Templates > Windows Components > Remote Desktop Services > Remote Desktop Session Host > Connections > Select RDP transport protocol = Use only TCP

You can also set this on the client side by specifying:

Computer Config > Windows Settings > Admin Templates > Windows Components > Remote Desktop Services > Remote Desktop Connection Client > Turn off UDP on Client = Enabled

2. Disable “DisableTaskOffload” in the Registry

I also added below registry setting to improve performance.

A little explanation of TCP Offloading:

“TCP offload engine is a function used in network interface cards (NIC) to offload processing of the entire TCP/IP stack to the network controller. By moving some or all of the processing to dedicated hardware, a TCP offload engine frees the system’s main CPU for other tasks. However, TCP offloading has been known to cause some issues, and disabling it can help avoid these issues.”

  • Open RegEdit on the Windows Server machine.
  • Navigate to this registry key in the tree on the left: HKEY_LOCAL_MACHINE\SYSTEM\CurrentControlSet\Services\Tcpip\Parameters
  • Right-click on the right side, and add a new DWORD (32-bit) Value
  • Set the value name to DisableTaskOffload and the value data to 1

Now Reconnect to the Server via RDP (to a new session) and your performance should be normal.


SSH2_MSG_UNIMPLEMENTED packet error with PuTTY and RHEL 7.2

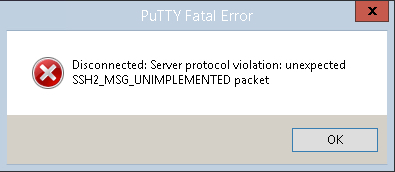
I recently updated one of my RHEL 7.2 servers with yum update -y. After a reboot, I tried to connect to the machine using PuTTY client, but the connection faild with the following error:

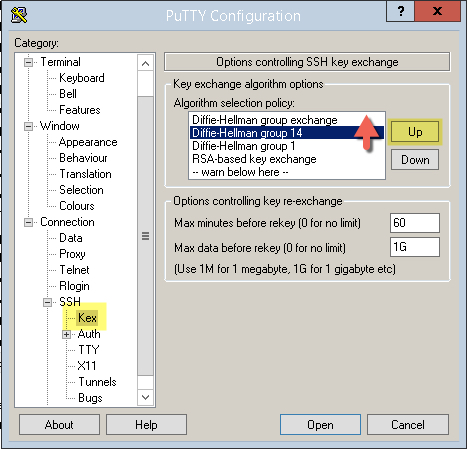
To solve the issue, open the configuration for the connection and navigate to SSH -> Kex. In the “Algorithm selection policy”, move the “Diffie-Hellman group 14” entry to the first position in the list.

Now click open and continue working …


[FREE] – midpoints Let’s Encrypt 4 Domino (LE4D)

To enable HTTPS on your website, you need to get a certificate from a Certificate Authority. These certificates can be rather expensive, especially if you have several domains or domains that use subject alternate names (SAN).

Let’s Encrypt is a CA that offers certificates for FREE. The only limit is that the certificates expire after 90 days. But you can renew them as often as you like.

In order to get a certificate for your website’s domain from Let’s Encrypt, you have to demonstrate control over the domain. With Let’s Encrypt, you do this using software that uses the ACME protocol, which typically runs on your web host.

Let’s Encrypt has a long list of clients that can be used for certificate creation and renewal. There are clients for Windows or Linux; none of the clients runs on both OS. You could use scripts; but you would have to install Perl, Python or other script interpreters on your Domino server, which is not always possible due to security policies.

And, there is no client for IBM Domino.

midpoints Let’s Encrypt for Domino ( midpoints LE4D ) closes this gap.

  • midpoints LE4D provides all parts of the certificate creation / renewal process in a single Domino application.
  • midpoints LE4D lets you fully automate the process, including renewal of certificates in the keyring file and HTTP task restart.
  • midpoints LE4D has been tested on Domino 9.0.1 FP7 and FP9, but due to it’s Java compliance, midpoints LE4D should also work on Domino versions prior to the tested versions.
  • midpoints LE4D runs on Windows and Linux.
  • midpoints LE4D does not need any 3rd party software ( except for IBM Kyrtool )

Create a new application from the template, create a configuration for your domain, install kyrtool on the server and start an agent ( the agent can later be started on a scheduled basis using a program document ).

midpoints LE4D will register a new account for your domain, creates a private user and domain key. It will then create the certificate signing request and sends it to Let’s Encrypt. Then it receives a challenge token and puts it on your server.

After Let’s Encrypt has validated the token, your certificates are being downloaded and moved to the keyring file on your server. Additionally midpoints LE4D can restart the HTTP task for you.

Interested? Then get your copy of midpoints LE4D today for FREE.


What is the SIZE of a Docker container?

I recently was  asked, if it is possible to tell the size of a container and, speaking of disk-space, what are the costs when running multiple instances of a container.

Let’s take the IBM Domino server from my previous post as an example.

You can get the SIZE of a container with the following command:

# docker ps -as -f “name=901FP9”
CONTAINER ID IMAGE COMMAND CREATED STATUS PORTS NAMES SIZE
5f37c4d6a826 eknori/domino:domino_9_0_1_FP_9 “/docker-entrypoint.s” 2 hours ago Exited (137) 6 seconds ago 901FP9 0 B (virtual 3.296 GB)

We get a SIZE of 0 B (virtual 3.296 GB) as a result. Virtual size? What is that?

Let me try and explain:
When starting a container, the image that the container is started from is mounted read-only. On top of that, a writable layer is mounted, in which any changes made to the container are written.
The read-only layers of an image can be shared between any container that is started from the same image, whereas the “writable” layer is unique per container (because: you don’t want changes made in container “a” to appear in container “b” )
Back to the docker ps -s output;

  • The “size” information shows the amount of data (on disk) that is used for the writable layer of each container
  • The “virtual size” is the amount of disk-space used for the read-only image data used by the container.

So, with a 0 B container size, it does not make any difference, if we start 1 or 100 containers.

Be aware that the size shown does not include all disk space used for a container. Things that are not included currently are;

  1. volumes used by the container
  2. disk space used for the container’s configuration files (hostconfig.json, config.v2.json, hosts, hostname, resolv.conf) – although these files are small
  3. memory written to disk (if swapping is enabled)
  4. checkpoints (if you’re using the experimental checkpoint/restore feature)
  5. disk space used for log-files (if you use the json-file logging driver) – which can be quite a bit if your container generates a lot of logs, and log-rotation (max-file / max-size logging options) is not configured

So, let’s see what we have to add to the 0 B to get the overall size of our container.

We are using a volume “domino_data” for our Domino server . To get some information about this volume (1) type

# docker volume inspect domino_data
[
{
“Name”: “domino_data”,
“Driver”: “local”,
“Mountpoint”: “/var/lib/docker/volumes/domino_data/_data”,
“Labels”: {},
“Scope”: “local”
}
]

This gives us the physical location of that volume. Now we can get the size of the volume, summing up the size of all files in the volume.

# du -hs /var/lib/docker/volumes/domino_data/_data
1.1G /var/lib/docker/volumes/domino_data/_data

To get the size of the container configuration (2), we need to find the location for our container.

# ls /var/lib/docker/containers/
5f37c4d6a8267246bbaff668b3437f121b0fe375d8319364bf7eb10f50d72c69

Now we have the long Id for our CONTAINER ID. Next type

# du -hs 5f37c4d6a8267246bbaff668b3437f121b0fe375d8319364bf7eb10f50d72c69/
160K 5f37c4d6a8267246bbaff668b3437f121b0fe375d8319364bf7eb10f50d72c69/

Now do the math yourself.  x = (0B + 1.1GB + 160kB ) * n .

I leave it up to you to find out the other sizes ( 3 – 4 ) .

Sizes may vary and will change during runtime; but I assume that you got the idea.  Important to know is that all containers that are using the same image in the FROM command in a Dockerfile share this (readonly) image, so there is only one copy of it on disk.


Domino on Docker

IBM recently announced Docker support for Domino. It is supposed to come with FP10 at the end of this year.

Domino IMHO is not a microservic, but Domino on Docker has other advantages.

Think about a support person maintaining a product. All he needs to investigate a customer’s issue is the data from the customer and a Domino environment that is known to run the application stable. He can the create a new container from a Docker image, copy the files from the customer into the container, start Domino and then he can try to reproduce the issue.

You can also do this with VMs, but Docker images are more flexible. Our supporter might expect that the customer uses a specific version of Linux for the Domino server installation. But it turns out, that he uses the lastest build of the Linux OS.  You would need to setup a new VM with the Linux version that is needed, install and configure Domino etc … Waste of time and resources. Using Docker, this is just one change in a Dockerfile.

I will be speaking about Docker at AdminCamp 2017 in September. I will talk about Docker in general and also about Domino on Docker. In this blogpost, I want to show, how easy it is to create a Domino image ( optional with FP), and then build and run a Docker container from the image.

I assume that you already have Docker installed on a host. I am using RHEL 7 as the host OS for Docker.

Let us start with the basic Domino 9.0.1 image. I am using the excellent start scripts for Domino by Daniel Nashed. If you run Domino on Linux and you do not already have the scripts, get and use them.

First of all, create a new directory on your host. This directory will be used to store the needed Dockerfiles. You can also download the files and use them.

All Domino installation files should be accessible from a web server. replace the YOUR_HOST placeholder with your webserver

Here is the Dockerfile for the Domino 9.0.1 basic installation.

FROM centos

ENV DOM_SCR=resources/initscripts 
ENV DOM_CONF=resources/serverconfig 
ENV NUI_NOTESDIR /opt/ibm/domino/

RUN yum update -y && \
    yum install -y which && \
    yum install -y wget && \
	yum install -y perl && \
    useradd -ms /bin/bash notes && \
    usermod -aG notes notes && \
    usermod -d /local/notesdata notes && \
    sed -i '$d' /etc/security/limits.conf && \
    echo 'notes soft nofile 60000' >> /etc/security/limits.conf && \
    echo 'notes hard nofile 80000' >> /etc/security/limits.conf && \
    echo '# End of file' >> /etc/security/limits.conf

COPY ${DOM_CONF}/ /tmp/sw-repo/serverconfig

RUN mkdir -p /tmp/sw-repo/ && \
    cd /tmp/sw-repo/ && \
    wget -q http://YOUR_HOST/DOMINO_9.0.1_64_BIT_LIN_XS_EN.tar && \
    tar -xf DOMINO_9.0.1_64_BIT_LIN_XS_EN.tar &&\
    cd /tmp/sw-repo/linux64/domino && \
    /bin/bash -c "./install -silent -options /tmp/sw-repo/serverconfig/domino901_response.dat" && \
    cd / && \
    rm /tmp/* -R

RUN mkdir -p /etc/sysconfig/
COPY ${DOM_SCR}/rc_domino /etc/init.d/
RUN chmod u+x /etc/init.d/rc_domino && \
    chown root.root /etc/init.d/rc_domino
COPY ${DOM_SCR}/rc_domino_script /opt/ibm/domino/
RUN chmod u+x /opt/ibm/domino/rc_domino_script && \
    chown notes.notes /opt/ibm/domino/rc_domino_script
COPY ${DOM_SCR}/rc_domino_config_notes /etc/sysconfig/

We install Domino on the latest CentOS build; if you want to use a specific CentOS build, change the first line in the Dockerfile and add the buildnumber.

You can see a lot of commands that have been combined into one RUN statement. Doing it this way, you can keep the image size a bit smaller. Each RUN command would create an extra layer and this will increase the size of your image.

So, in the first part, we update the CentOS image from the Docker repository with the latest fixes and also install additional packages that we need for the Domino installation.
Next, we copy our response.dat file and the start scripts to our image.
Now we download the Domino 9.0.1 installation package, unpack it and do a silent installation using our response.dat file for configuration.
Last part is installation of the start script files, assigning user and group and granting permissions

All temporary files are also deleted.

Now we can create an image from the Dockerfile.

docker build -t eknori/domino:9_0_1 -f Dockerfile .

This will take about 10 – 15 minutes. When the build is completed, we can list our image

# docker images

eknori/domino 9_0_1 96b6220d177c 14 hours ago 1.883 GB

Next we will use this image and install FP9. If you need some other FP, tweak the Dockerfile to your own needs. Once you get familiar to Docker, this is easy.

FROM eknori/domino:9_0_1

ENV DOM_CONF=resources/serverconfig
ENV NUI_NOTESDIR /opt/ibm/domino/

COPY ${DOM_CONF}/ /tmp/sw-repo/serverconfig

RUN mkdir -p /tmp/sw-repo/ && \
cd /tmp/sw-repo/ && \
wget -q http://YOUR_HOST/domino901FP9_linux64_x86.tar && \
tar -xf domino901FP9_linux64_x86.tar &&\
cd /tmp/sw-repo/linux64/domino && \
/bin/bash -c "./install -script /tmp/sw-repo/serverconfig/domino901_fp9_response.dat" && \
cd / && \
rm /tmp/* -R && \
rm /opt/ibm/domino/notes/90010/linux/90010/* -R

A much shorter Dockerfile, as we already have installed Domino and now can reuse the 9_0_1 image as the base image for our 9_0_1_FP_9 image.

The last line in the RUN command removes the uninstall information. Maybe this can be done in the response.dat file also, but you should do this anyway, as we do not need the backup files.

Again, build the new image.

docker build -t eknori/domino:9_0_1_FP_9 -f Dockerfile .

# docker images
eknori/domino 9_0_1_FP_9 ed0276f21d73 14 hours ago 3.296 GB

Now we can build or final Domino 9.0.1FP9 from the 9_0_1_FP_9.

Our Dockerfile looks like this

FROM eknori/domino:9_0_1_FP_9

EXPOSE 25 80 443 1352

COPY resources/docker-entrypoint.sh /
RUN chmod 775 /docker-entrypoint.sh

USER notes
WORKDIR /local/notesdata
ENV LOGNAME=notes
ENV PATH=$PATH:/opt/ibm/domino/

ENTRYPOINT ["/docker-entrypoint.sh"]

and the file used in the ENTRYPOINT command contains the following

#!/bin/bash

serverID=/local/notesdata/server.id

if [ ! -f "$serverID" ]; then
/opt/ibm/domino/bin/server -listen 1352
else
/opt/ibm/domino/rc_domino_script start
/bin/bash
fi

The ENTRYPOINT is executed when the container starts. The script just checks, if the server is already configured. If not, it starts the server in LISTEN mode. If it finds a server.id, it starts the server.

Let us build or final image.

docker build -t eknori/domino:domino_9_0_1_FP_9 -f Dockerfile .

# docker images
eknori/domino domino_9_0_1_FP_9 1fae2fe73df4 2 hours ago 3.296 GB

Now we are ready to create a container from the image. But we need one additional step. All changes that we make in a container will be lost, once the container is stopped. So we need to create a persitent data store and attach it to the container.

To create a persitent volume, type

docker volume create –name=domino_data

And then type

docker run -it -p 1352:1352 -p 8888:80 -p 8443:443 –name 901FP7 -v domino_data:/local/notesdata eknori/domino:domino_9_0_1_FP_9

to build and run the container. I have used port 1352 instead of 8585 to avoid to open another port on the host system.

After the build, the ENTRYPOINT will start the Domino server in LISTEN mode. You can now setup your server using the remote setup tool.

After you have setup your server, close the remote setup and stop Domino. This will also stop your container.

You can start and get access to the container with

docker start 901FP9
docker attach 901FP9

This gives you great flexibility. Once FP10 is in the wild, create a new image from the 9_0_1 image and install FP10. Then create a new image for your final Domino installation. Run this image and attach the persitent volume.