Electron – Cross Platform Desktop Apps Made Easy (Part 4) #ibmchampion

Today, I want to show how you can use a system file dialog in your Electron application to select a file in the filesystem and display its content.

As always, we will create a new application. Create a new folder in your projects directory, change into the folder and from a terminal window initialize the application with npm init. Then execute npm install electron --save-dev to install electron and add it as a dependency to package.json.

Don’t forget to add a start script to package.json. This will let you start your application from the command line by simply running the npm start command.

Your package.json should look similar like this.

{
  "name": "part4",
  "version": "1.0.0",
  "description": "",
  "main": "app.js",
  "scripts": {
    "start": "electron ."
  },
  "author": "Ulrich Krause",
  "license": "MIT",
  "devDependencies": {
    "electron": "^1.8.2"
  }
}

Next create a new file, app.js. That is the main file of our application.

On application start, we want to open a system file dialog when the main.html has been loaded. We can then browse and select a file in the filesystem. When the OK button is clicked, the application will load the file and display its content.

const {app, BrowserWindow, ipcMain} = require('electron') 
const url = require('url') 
const path = require('path') 

let win  

function createWindow() { 
   win = new BrowserWindow({width: 800, height: 600}) 
   win.loadURL('file://' + __dirname + '/main.html') 
}  

ipcMain.on('openFile', (event, path) => { 
   const {dialog} = require('electron') 
   const fs = require('fs') 
   dialog.showOpenDialog(function (fileNames) { 

      if(fileNames === undefined) { 
         console.log("No file selected");    
      } else { 
         readFile(fileNames[0]); 
      } 
   });
   
   function readFile(filepath) { 
      fs.readFile(filepath, 'utf-8', (err, data) => { 
         
         if(err){ 
            alert("An error ocurred reading the file :" + err.message) 
            return 
         } 
         
         // handle the file content 
         event.sender.send('fileData', data) 
      }) 
   } 
})  
app.on('ready', createWindow)

Have you noticed the let win in line 9? We have not used it before. But it is an important detail in an Electron app. Without this line your win object ( the main window of your application ) would be destroyed as soon as the garbage collection recyles the object, and your application will die. If you use let win, you are save.

When the main process loads main.html, the ipcRenderer on main.htmll sends the ‘openFile‘ message to the main process ( line 11 in main.html ).
In line 12 of app.js, this message is catched and the file dialog opens. You can then browse and select a file. Once you have confirmed your selection, the content of the file is being read into data and then send to the renderer in line 33 along with the ‘fileData‘ message.

<!DOCTYPE html> 
<html> 
   <head> 
      <meta charset = "UTF-8"> 
      <title>File read using system dialogs</title> 
   </head> 
   
   <body> 
      <script type = "text/javascript"> 
         const {ipcRenderer} = require('electron') 
         ipcRenderer.send('openFile', () => { 
         }) 
         
         ipcRenderer.on('fileData', (event, data) => { 
            document.write(data) 
         }) 
      </script> 
   </body> 
</html>

When the renderer receives the ‘fileData‘ message in line 14, it will write the content of data to the document.

This is only a simple example, but I think, that you got the idea of how to use system dialogs in your Electron application. Try to create a button, that opens the dialog on click. It is not that difficult πŸ™‚

you can download the source code for this part of the tutorial here.

Electron – Cross Platform Desktop Apps Made Easy (Q & A) #ibmchampion

I got some very good feedback on the first 3 articles. So, thank you very much for kind words, critics and suggestions! Much appreciated.

Also, I got a couple of questions. Instead of answering the questions offline, I thought it is a good idea to add a Q&A article to the tutorial. I will add more content as questions are coming in.

I am NOT an expert in Javascript, Node.js or Electron. I will answer the questions as best I can. Feel free to add comments.

Q: I have never worked with Node.js and npm. What the heck is it?

Node.js is an open source, cross-platform runtime environment for developing server-side and networking applications. Node.js applications are written in JavaScript, and can be run within the Node.js runtime on OS X, Microsoft Windows, and Linux.

Node.js also provides a rich library of various JavaScript modules which simplifies the development of web applications using Node.js to a great extent.

Node.js = Runtime Environment + JavaScript Library

NPM is a package manager for Node.js packages, or modules if you like. It can be compared to Linux, where you use apt-get, yum and the like to add or update functions to the core Linux system. In Java, you would add .jar files from the Maven repository to your project to make specific classes and method available without reinventing the wheel. www.npmjs.com hosts thousands of free packages to download and use.

A package in Node.js contains all the files you need for a module. Modules are JavaScript libraries you can include in your project.

The NPM program is installed on your computer when you install Node.js. NPM creates a folder named “node_modules“, where the package will be placed. All packages you install in the future will be placed in this folder.

NPM = online repositories for node.js packages/modules which are searchable on search.nodejs.org

NPM = command line utility to install Node.js packages, do version management and dependency management of Node.js packages.

Q: I am using Visual Studio Code. Do I really need an additional terminal window to launch applications?

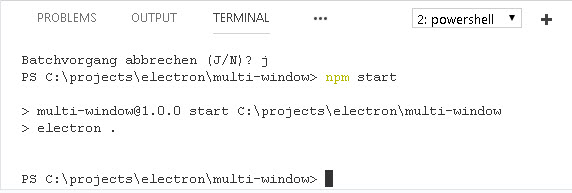
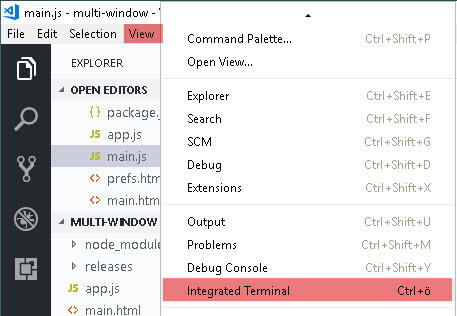
No, you don’t need an additional terminal window. Visual Studio Code comes with an integrated terminal.
To activate click on “View -> Integrated Terminal”Β  or use Strg + Backtick ( Strg + ΓΆ when you have a German keyboard layout ) to toggle the integrated terminal on/off.

You can also open an additional instance of the terminal by clicking on the plus sign.

For more details on how to configure the integrated terminal, I recommend reading this article.

Q: Why no semicolons?

I thought it was still best to include them to avoid potential problems.

That’s a common misconception, here is a response to it: http://blog.izs.me/post/2353458699/an-open-letter-to-javascript-leaders-regarding

Is there a coding standard for Node.js which explains how semicolons should be used?

Oh yeah, there are a lot of coding standards. And that’s the problem. πŸ™‚
I think I’ll just explain why I moved away from using semicolons. It’s easier to see potential errors this way.

I mean, if you use semicolons, one semicolon missing could go unnoticed. Because your eye is trained to treat them as end of line noise. Here is an example of an error that you could have:

function test() {
  var foo = '123';
  var bar = '456';
  var example = a_long_line_without_ending_semicolon
                                              //   ^^^ 
                                              // this would usually go unnoticed

  (function () {
    console.log(example); 
  })(example);
}

But if you don’t use them, the semicolon at the end of the line never matters.

Semicolons in JavaScript are optional

Here is an article that covers the topic in deep.

Q: Why you sometimes use curly braces with const and sometimes not?

To instantiate an Electron object, you would normally write

const app = require('electron').app
const BrowserWindow = require('electron').BrowserWindow
const ipcMain = require('electron').ipcMain

That is a lot of redundancy in code. A better way is to assign the entire Electron framework to an object und use this object to extract the Electron object that we want.

const electron = require('electron')
const app = electron.app
const BrowserWindow = electron.BrowserWindow
const ipcMain = electron.ipcMain

Slightly better, isn’t it?

Chrome 49 added destructuring assignment to make assigning variables and function parameters much easier and we can just write

const electron = require ('electron');
const {app, BrowserWindow, ipcMain} = electron;

or

const {app, BrowserWindow, ipcMain} = require ('electron');

as the shortest possible. You can use the latter, if you have a final list of objects. The first one is handy, if you want to get access to other Electron objects in your code. You simply reference to electron then.

Q: The menu is also visible in the Preferences page; how can I hide it?

In main.js, menu is build and added to the application in lines 18 and 19.

const {remote, ipcRenderer} = require('electron')
const {Menu} = remote.require('electron')

const template = [
    {
       label: 'Electron',
       submenu: [
        {
            label: 'Preferences',
            click: function() {
                ipcRenderer.send('show-prefs')
            }
        }
       ]
    }
]

var menu = Menu.buildFromTemplate(template)
Menu.setApplicationMenu(menu)

The static method Menu.setApplicationMenu(menu) sets menu as the application menu on macOS. On Windows and Linux, the menu will be set as each window’s top menu.

This explains, why the menu is also visible in the Preferences page. How can it be removed?

You can use autoHideMenuBar:true. This will auto hide the menu bar. The downside is that you can still toggle the visibility when the Alt key is pressed.

const electron = require ('electron');
const {app, BrowserWindow, ipcMain} = electron;
app.on('ready', function() {
  var mainWindow = new BrowserWindow({
      width:800,
      height:600
  });
mainWindow.loadURL('file://' + __dirname + '/main.html');
mainWindow.openDevTools();

var prefsWindow = new BrowserWindow({
  width:400,
  height:400,
  show:false,
  autoHideMenuBar:true
});

prefsWindow.loadURL('file://' + __dirname + '/prefs.html');

ipcMain.on('show-prefs', function() {
  prefsWindow.show()
});

ipcMain.on('hide-prefs', function() {
  prefsWindow.hide()
});
})